Wednesday, August 20, 2008

SharePoint Form Based Authentication (FBA) Using LDAPMembership Provider

-In the previous post i blogged "SharePoint Form Based Authentication (FBA) Using SQLMembership Provider". I hope you did it smoothly.
- Here we have a different type of sharepoint security Form Based Authentication "FBA".
- In this case you want to enable your colleagues at your company active directory to login to your sharepoint site using login form.

be carful while editing(parameters will be mentioned below).

1- Configure SharePoint site which Form authentication will be applied to:
  • Navigate to web site folder for targete sharepoint site and open “Web.config”.

C:\Inetpub\wwwroot\wss\VirtualDirectories\1214

  • Add text below (membership provider definition) between authentication> and <identity impersonate="true" />:
  • - <membership defaultProvider="LDAPMem">
    - <providers>
    <add name="LDAPMem" type="Microsoft.Office.Server.Security.LdapMembershipProvider, Microsoft.Office.Server, Version=12.0.0.0, Culture=neutral, PublicKeyToken=71e9bce111e9429c" server="ADServerName" port="389" useSSL="false" userDNAttribute="distinguishedName" userNameAttribute="sAMAccountName" userContainer="DC=Test,DC=com,DC=AE" userObjectClass="person" userFilter="((ObjectCategory=group)(ObjectClass=person))" scope="Subtree" otherRequiredUserAttributes="sn,givenname,cn" /> providers> membership>
    - <roleManager defaultProvider="LDAPROLE" enabled="true" cacheRolesInCookie="true" cookieName=".PeopleDCRole">
    - <providers>
    <add name="LDAPROLE" type="Microsoft.Office.Server.Security.LdapRoleProvider, Microsoft.Office.Server, Version=12.0.0.0, Culture=neutral, PublicKeyToken=71e9bce111e9429c" server="ADServerName" port="389" useSSL="false" groupContainer="DC=Test,DC=com,DC=AE" groupNameAttribute="cn" groupMemberAttribute="member" userNameAttribute="sAMAccountName" dnAttribute="distinguishedName" groupFilter="(ObjectClass=group)" scope="Subtree" />Providers> roleManager>

  • NOTE:

    *server="ADServerName":
    active directory server name
    *userContainer="DC=Test,DC=com,DC=AE": your domain name (Test.com.AE)

    - theses only 2 parameter you will change according to your environment settings.
2- Configure Central Administration Web.Config file:

  • Add text below (membership provider definition) between authentication> and <identity impersonate="true" />:
  • - <membership>
    - <providers>
    <add name="LDAPMem" type="Microsoft.Office.Server.Security.LdapMembershipProvider, Microsoft.Office.Server, Version=12.0.0.0, Culture=neutral, PublicKeyToken=71e9bce111e9429c" server="ADServerName" port="389" useSSL="false" userDNAttribute="distinguishedName" userNameAttribute="sAMAccountName" userContainer="DC=Test,DC=com,DC=AE" userObjectClass="person" userFilter="((ObjectCategory=group)(ObjectClass=person))" scope="Subtree" otherRequiredUserAttributes="sn,givenname,cn" /> Providers
    >membership>

    - <roleManager defaultProvider="AspNetWindowsTokenRoleProvider" enabled="true" cacheRolesInCookie="true" cookieName=".PeopleDCRole">
    - <providers>
    <add name="LDAPROLE" type="Microsoft.Office.Server.Security.LdapRoleProvider, Microsoft.Office.Server, Version=12.0.0.0, Culture=neutral, PublicKeyToken=71e9bce111e9429c" server="ADServerName" port="389" useSSL="false" groupContainer="DC=Test,DC=com,DC=AE" groupNameAttribute="cn" groupMemberAttribute="member" userNameAttribute="sAMAccountName" dnAttribute="distinguishedName" groupFilter="(ObjectClass=group)" scope="Subtree" />provider>roleManager>


  • NOTE: At “roleManager” the “defaultProvider” value is set to “AspNetWindwosTokenProvider”

3- Configure Authentication for our site to be form based:


  • Open “SharePoint 3.0 central administration” ->”Application Management”->“Authentication providers”.


  • Select your website “sharepoint 1214”.


  • Be sure “Web Application” to be targeted site and note that “Membership Provider Name” is “windows”. Now Click “Default”.


  • Select “Forms” as “Authentication type”.
    o Membership provider name: LDAPMem
    o Role manager name: LDAPROLE


  • Open “SharePoint 3.0 central administration” ->”Application Management”->“Site collection Administrators”.


  • Be sure the selected site collection is your target site.


  • At “Primary site collection administrator” type: Ahmed.


  • “Ahmed” is my ID at my Active Directory.


  • Now we grant our users located at active directory (MossFBA) to access to our site.


  • Open your browser and navigate to targeted site you will automatically redirected to login page ask for username and password.


Thursday, August 14, 2008

SharePoint Form Based Authentication (FBA) Using SQLMembership Provider

- Here we have a very common sharepoint security issue is facing any Moss specialist, it is Form Based Authentication "FBA".
- It is very powerful feature to your company.
- In case you want your customer's company access your portal keeping them away of your active directory you should do what I'll mention below.
- Before I start I'm very grateful to Andrew Connel for great post which helps me a lot.
- What I write below is for simplicity, If you wanna more, please explore Andrew blog.

Listen carefully(I mean read carefully) any step is effective, don't miss any.

  1. Create Database to store external users accounts:
  • Create SQL Server membership database to store external users (non Active Directory users) using VS tool called “aspnet_regsql.exe” located at:

    C:\WINDOWS\Microsoft.NET\Framework\v2.0.50727
  • It will launch wizard as below:

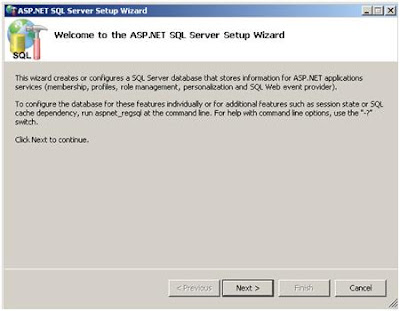
  • Select “Configure SQL Server for application services” then click “NEXT”.


  • Enter your database Server name and Database name you will use for authentication then click “NEXT”.


  • Accept the Settings Summary page and click “NEXT”.


  • Last screen inform that the database has been created then click FINISH.

2. Create connection to SQL membership and add new users:

  • Here we want to add new users at “MossFBA” database to grant access to our sharepoint website.

  • Open VS.NET (C# 2008 used here) and create new website (host it anywhere).

  • At “web.config” replace with text below <connection string /> to SqlMemebership database between <appSettings /> and <system.web> tags :

<connectionStrings>
<add name="FBA_SqlConnectionString" connectionString="server= m11-214-04;database=MossFBA;Integrated Security=SSPI;" providerName="System.Data.SqlClient"/>
connectionStrings>


m11-214-04: Is your database server name.
MossFBA: Database name for Sqlmembership.

  • We still at “web.config” of website, add text below (membership provider definition) between compilation> and <authentication mode="Windows" /> :

    <membership defaultProvider="FBA_AspNetSqlMembershipProvider">
    <providers>
    <add connectionStringName="FBA_SqlConnectionString" passwordAttemptWindow="10"
    enablePasswordRetrieval="false"
    enablePasswordReset="true" requiresQuestionAndAnswer="false"
    applicationName="/"
    minRequiredPasswordLength="1" maxInvalidPasswordAttempts="5"
    minRequiredNonalphanumericCharacters="0" requiresUniqueEmail="false"
    passwordFormat="Hashed"
    description="Stores and retrieves membership data from the Microsoft SQL Server database"
    name="FBA_AspNetSqlMembershipProvider" type="System.Web.Security.SqlMembershipProvider, System.Web, Version=2.0.0.0, Culture=neutral, PublicKeyToken=b03f5f7f11d50a3a" />
    providers
    >
    membership>


    <roleManager enabled="true"
    defaultProvider="FBA_AspNetSqlRoleProvider" >
    <providers>
    <add name="FBA_AspNetSqlRoleProvider"
    type="System.Web.Security.SqlRoleProvider, System.Web, Version=2.0.3600.0, Culture=neutral, PublicKeyToken=b03f5f7f11d50a3a"
    connectionStringName="FBA_SqlConnectionString"
    applicationName="/"
    />
    providers>
    roleManager>
  • NOTE: Connection string name should be the same as defined in first block “Connection string definition” (here FBA_SqlConnectionString).
  • At VS.NET IDE (Integrated Development Environment) from “WebSite” menu select “ASP.NET Configuration” for adding new users and roles.


  • New window will open.


  • Select “Security” then “Select authentication type”.


  • Select “From The Internet” to enable Form authentication (default is windows) then “DONE”.

  • Select “Select a different provider for each feature (advanced)” to ensure that our Membership and Role providers are tested and selected.


  • Select “FBA_AspNetSqlMembershipProvider” then click “Test”.then select “FBA_AspNetSqlRoleProvider” then click “Test”.


  • Move to “Security” tab again and click “Add user”- test-, fill in the form and click “Create user”.

  • New we have Database “MossFBA” with connection string “FBA_SqlConnectionString” and user created “test” as external user to login to our sharepoint site.


3- Configure SharePoint site which Form authentication will be applied to:

Navigate to web site folder for targeted sharepoint site and open “Web.config”.

C:\Inetpub\wwwroot\wss\VirtualDirectories\1212

  • At “web.config” add text below(connection string) to SqlMemebership database between <appSettings/> and <system.web> tags :

    <connectionStrings>
    <add name="FBA_SqlConnectionString" connectionString="server= m11-214-04;database=MossFBA;Integrated Security=SSPI;" providerName="System.Data.SqlClient"/>
    connectionStrings>

    m11-214-04: Is your database server name.
    MossFBA: Database name for Sqlmembership.

  • Add text below (membership provider definition) between authentication> and <identity impersonate="true" />:

    <membership defaultProvider="FBA_AspNetSqlMembershipProvider">
    <providers>
    <add connectionStringName="FBA_SqlConnectionString" passwordAttemptWindow="10"
    enablePasswordRetrieval="false"
    enablePasswordReset="true" requiresQuestionAndAnswer="false"
    applicationName="/"
    minRequiredPasswordLength="1" maxInvalidPasswordAttempts="5"
    minRequiredNonalphanumericCharacters="0" requiresUniqueEmail="false"
    passwordFormat="Hashed"
    description="Stores and retrieves membership data from the Microsoft SQL Server database"
    name="FBA_AspNetSqlMembershipProvider" type="System.Web.Security.SqlMembershipProvider, System.Web, Version=2.0.0.0, Culture=neutral, PublicKeyToken=b03f5f7f11d50a3a" />
    providers>
    membership>


    <roleManager enabled="true"
    defaultProvider="FBA_AspNetSqlRoleProvider" >
    <providers>
    <add name="FBA_AspNetSqlRoleProvider"
    type="System.Web.Security.SqlRoleProvider, System.Web, Version=2.0.3600.0, Culture=neutral, PublicKeyToken=b03f5f7f11d50a3a"
    connectionStringName="FBA_SqlConnectionString"
    applicationName="/"
    />
    providers>roleManager>


    4- Configure Central Administration Web.Config file:

  • At “web.config” add text below(connection string) to SqlMemebership database between <appSettings/> and <system.web> tags :

    <connectionStrings>
    <add name="FBA_SqlConnectionString" connectionString="server= m11-214-04;database=MossFBA;Integrated Security=SSPI;" providerName="System.Data.SqlClient"/>connectionStrings>

    m11-214-04: Is your database server name.
    MossFBA: Database name for Sqlmembership.

  • Add text below (membership provider definition) between authentication> and <identity impersonate="true" />:


    <membership defaultProvider="FBA_AspNetSqlMembershipProvider">
    <providers>
    <add connectionStringName="FBA_SqlConnectionString" passwordAttemptWindow="10"
    enablePasswordRetrieval="false"
    enablePasswordReset="true" requiresQuestionAndAnswer="false"
    applicationName="/"
    minRequiredPasswordLength="1" maxInvalidPasswordAttempts="5"
    minRequiredNonalphanumericCharacters="0" requiresUniqueEmail="false"
    passwordFormat="Hashed"
    description="Stores and retrieves membership data from the Microsoft SQL Server database"
    name="FBA_AspNetSqlMembershipProvider" type="System.Web.Security.SqlMembershipProvider, System.Web, Version=2.0.0.0, Culture=neutral, PublicKeyToken=b03f5f7f11d50a3a" />
    providers>
    membership>


    <roleManager enabled="true"
    defaultProvider="AspNetWindowsTokenRoleProvider" >
    <providers>
    <add name="FBA_AspNetSqlRoleProvider"
    type="System.Web.Security.SqlRoleProvider, System.Web, Version=2.0.3600.0, Culture=neutral, PublicKeyToken=b03f5f7f11d50a3a"
    connectionStringName="FBA_SqlConnectionString"
    applicationName="/"
    />
    providers>roleManager>

    NOTE:At “roleManager” the “defaultProvider” value is set to “AspNetWindwosTokenProvider


    5- Configure Authentication for our site to be form based:

  • Open IIS which host “Moss2007” then check for user account which has access to your site.from “Application Pools”->“SharePoint 1212” -> RightClick -> Properties->Identity.

  • Now you have got the “User Name” then go to you your database server “host MossFBA database”.

  • Open “MossFBA” database -> expand “Security”->expand “Users”--rightClick--> “New User”.
    o At “UserName” type “FBAUser” it is alias name.
    o At “Login name” type user name you picked from previous step (previous image).
    o Here we grant access for Sql database contains our user’s name we created in step no.2.
    o Check “db_owner” as database role membership (you should select appropriate permission for your users, I did this for demo only).


    • Open “SharePoint 3.0 central administration” -> ”Application Management”-> “Authentication providers”.

    • Select your website “sharepoint 1212”.

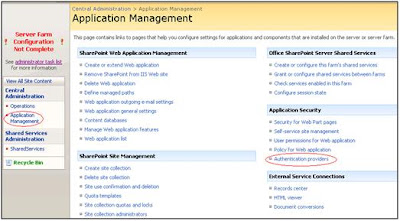
    • Be sure “Web Application” is your targeted site and note that “Membership Provider Name” is “windows”. Now Click “Default”.


    • Select “Forms” as “Authentication type”.
      o Membership provider name: FBA_AspNetSqlMembershipProvider
      o Role manager name: FBA_AspNetSqlRoleProvider


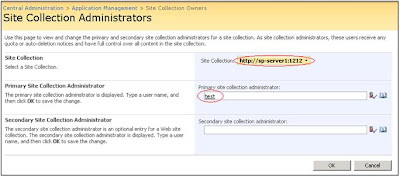
    • Open “SharePoint 3.0 central administration” -> ”Application Management” -> “Site collection Administrators”.


    • Be sure the selected site collection is your targeted site.
      o At “Primary site collection administrator” type: test.
      “test” is the username we created in “MossFBA”.

    • Now we grant our users from SQL Server membership database (MossFBA) access to our site and our site is not accessible for local windows accounts or active directory users.

    • Open your browser and navigate to targeted site you will automatically redirected to login page ask for username and password.

    • Congratulations….you logged in…welcome home.


    Monday, August 11, 2008

    Debugging SharePoint Web Part-I

    In my earlier post I touched how to develop SharePoint web part using VS.NET. Now we'll walk through debugging our web part, can you imagine? you are developing .NET project so all facilities you used to be found in programming websites are available in sharepoint webpart development.

    There are 2 cases right here:

    1. Debugging Web Part has been developed on your sharepoint site server.

    2. Debugging Remotely Web Part has been developed on your local machine.
    *First :Debugging Web Part has been developed on your sharepoint site server:
    1. To be able to debug your code(web part) you need to verify that your webpart DLL located at website BIN directory(in our case"C:\Inetpub\wwwroot\wss\VirtualDirectories\1234\Bin").
    2. Verify your assebly is registered as safe control at web.config file - If you want to deploy your webpart to "http://sp:1234/" you should modify web.config file of this site "C:\Inetpub\wwwroot\wss\VirtualDirectories\1234\web.config"- to know how to do this kindly open up this link.

    3. Open up your Webpart project in VS.NET.
    4. Set breakPoint wherever you want in your code.

    5. Select from Debug menu --> Attache to Process.
    6. Pop up box will appear listing all current running processes, select Process "w3wp.exe". may be you will see more than one from this process, select the one running with your username appear in User Name column.
    7. Now you are ready to debug your application.
    8. Get back to your page you deploy this webpart.
    9. As soon as you open the page contains the wepart, your cursor automatically goes to VS.NET project (webpart project) and will stop at your code line you set break point at.
    10. Effortless and useful.

    wait for second case...it will be soon.

    Sunday, August 10, 2008

    Breaking News - Microsoft Hands On Lab for WWS 3.0

    Guys..
    Breaking NEWs....
    while exploring the Internet I found this great HOLs for WWS 3.0 development and part of it webpart development using VSeWSSv12 (Extension for VS.NEt 2008) which I intended to blog it(Microsoft always has step ahead).
    My previous 2 posts (Part-1 - Part-II) were enough to create webparts manually and understand what goes on behind the scene. But I'll blog some issues related like (Security permissions - ToolPane...........etc) .

    The HOLs included are:
    1. Web Parts
    2. Data Lists
    3. Event Handlers
    4. Workflow
    5. Silverlight
    6. Page Navigation
    7. Page Branding
    8. Web Services
    9. Content Types
    10. User Authentication

    http://www.microsoft.com/downloads/details.aspx?FamilyID=b885dce8-c93f-48aa-b798-4422febcc200&DisplayLang=en

    don't miss it.

    Friday, August 8, 2008

    Moss 2007 Custom webparts (Part II-Development.)

    Well, after we setup our world(VS.NET project) to start coding MOSS custom webpart PART I here we will go into development phase(cheer up developers).

    Below i'll talk about webpart life cycel to know (when!! we can do what!!).

    1. OnInit(): This event handler is called immediately before the OnInit() method of the pagethat hosts the web part. This method can be used to initialize values required within the web part.
    2. OnLoad(): This event is called immediately before the OnLoad() method of the page that hosts the web part. This method is typically used to interact with the controls that are part of the web part.
    3. CreateChildControls(): This method can be used to add child controls to a web part and define event handlers for those child controls.
    4. PreRender(): This is the last event that occurs before the web part output is rendered to the page.
    5. Render(): This method sends the web part to its HTML writer. This method calls the following methods: RenderBeginTag(), RenderContents(), and RenderEndTag().
    6. RenderContents(): This method is responsible for adding content to the web part’s
      HTML writer.
    7. UnLoad(): This event occurs when the instance of the web part is discarded; at that time, the response is already sent back to the client. This is a good place to release any handles to resources that are still left open.
    I think these events are clear and understandable.
    1. Now Open our solution FirstWebPart and we will override method from WebPart class called RenderContents (defined above).
    2. We need to modify file called "Assemblyinfo.cs" with adding 2 lines "Using System.Security" as directive and Code line "[assembly: AllowPartiallyTrustedCallers()]".
    3. This will write message at your page as webpart output .
    4. To add your wepart to sharepoint, your DLL should be strongly signed(i.e. should has strong name key file this file grant we have only one PublicTokenKey across rebuilding your webpart project).
    5. To get this key file right click on your peoject name -->Properties -->sign -->check sign the assembly --> select "New" from combobox "choose strong name key file"/"Browse if you will use already exist key file-not recommended-" -->enter key file name "key" --> unchecked "protect my key file...."
    6. At Solution Explorer note that new file has been added to the solution "key".

    7. Now Build your project and be sure you don't have any errors.
    8. try yo drag your Firstwebpart.dll from your project directory (Ex.:C:\Documents and Settings\Administrator\My Documents\Visual Studio 2008\Projects\FirstWebPart\FirstWebPart\bin\Debug) and drop it at (C:\WINDOWS\assembly) to get ProductTokenKey and other information needed to register the Firstwebpart.dll into Sharepoint. (you can use any refactor tool to extract these information).

    9. Keep Marked information from previous image for later use and delete the file from (C:\WINDOWS\assembly)-I'll tell you why!! later -
    10. Now it's the time to deploy our webpart to sharepoint as every thing is ready and we have many ways to deploy it and we will discuss all in coming series but here I'll use manual deployment and we have 2 ways here (Deploy your DLL to GAC:Not recommended as your dll will be available to be used in range wider than desired or to your portal Bin directory: Recommended for this reason we modify "Assemblyinfo.cs" file in Point "2")
    11. Define your DLL as safecontrol to tell sharepoint this new control is completely safe to deal with by open your webapplication BIN directory (Ex.:C:\Inetpub\wwwroot\wss\VirtualDirectories\1234\bin) and paste FirstWebPart.DLL into it.
    12. Open Web.Config file (Ex.:C:\Inetpub\wwwroot\wss\VirtualDirectories\1234)
    13. Add new line at node as shown below.

    14. < assembly="FirstWebPart, Version=1.0.0.0, Culture=neutral, PublicKeyToken=7dea06abe781fd42" namespace="FirstWebPart" typename="*" safe="True">


    15. Now it is time to know how we can deploy our webpart from my SharePoint site itself.
    16. Follow images below.


    Here we did all required steps for moss webpart development and deployment.

    Moss 2007 Custom webparts (Part I-Environment Setup.)

    The first thing any Moss2007 developer think about is how to create custom webpart and see how it will enhance his website functionality even if this start is the most famous Microsoft starting application "Hello World".


    But here i'll go directly to the point which is "Start with environment setup, some concepts, developing simple webpart does something useful and walk through some enhancements to get robust one".


    So with this series whatever your proficiency level you will find your start-point for doing this stuff.


    Sorry for long intro. But i see it is nice to explain the strategy i'll follow at any issue i'll blog.


    let's have some fun.....


    Tools i use:
    • VS.NET 2008.
    • SharePoint Object Model(APIs-Application programming interface- for programmers).
    1. Open VS.NET 2008, from menu File --> New -->Projects.
    2. From left pane"Project types" select Visual C#--> Windows.
    3. At right pane"Templates" select Class Library.
    4. At text boxes down type your project "webpart" name "FirstWebPart".


    5. Let Visual Studio create the necessary project components for you.
    6. From Solution Explorer rename Class1.cs to FirstWebPart.cs.
    7. NOTE: At code editor, text after namespace and class are changed automatically(save seconds to rename it manually-thanks Microsoft).


    8. It's time to add some "DLLs" to help us to do our job.
    9. From Solution Explorer, right click on References --> Add Reference.

    10. Dialog Add Reference will appear and from .NET tab select tow references(System.Security - System.Web).

    11. To finish this step we missed only one important reference..Guess what? YES, it's SharePoint reference

    12. To get SharePoint DLL to be referenced at your project it depends on where you develop your webpart now, is it on machine with MOSS 2007 installed? or your own winXP machine(sharepoint not installed locally).

    13. CASE 1 "Machine with MOSS 2007 installed": Dialog Add Reference go to Browse tab and go to this URL(assuming your moss installed on c: drive)
      C:\Program Files\Common Files\Microsoft Shared\web server extensions\12\ISAPI

    14. CASE 2 "Local winXP machine": Ask your system administrator to locate this DLL on MOSS 2007 server and send it for you from mentioned ISAPI hive and save it at your local machine and locate it using previous step.

    15. At Solution Explorer the References node will look like the image below.
    16. Add directives to get access to different class inside references added earlier as Step1 shown in image below.
    17. Let your class inherits from WebPart class "That's why we add SharePoint reference-POINTS 12, 13 and 14"as Step2 shown in image below..

    18. After all these steps we have readymade environment for our development.

    Now we have space to start our development.

    Wait me next article and it will be soon...